Welcome to my blog

I hope you enjoy reading my posts, and please leave me a comment. I always enjoy reading them, and will try to visit you in return.

For security reasons for me and for you, I would appreciate it if you would leave your name on your comments.

You are welcome to copy any of my designs, as long as you do not take credit for them yourself. I am very happy for you to sell them. If I have used anyone else's design, I always try to give credit where it is due. If I have missed anything, please let me know and I will put things right.


This is intended to be mainly about my crafting stories, as a personal record of what I do. However, I interpret crafting quite widely, not just paper crafting but other things too. I have a butterfly mind and like to change from one thing to another depending on what I feel like on a given day - knitting, crochet, cross-stitch, cards, baking and several others, including my favourite right now, parchment, both traditional skills and Groovi, very relaxing and calming to do.

I have decided to put some structure into my blog so that each day will have something of a theme.
Monday- for Mindfulness; Tuesday - Tidy Up Day; Wednesday - What's on Your Workdesk Wednesday; Thursday - Technique and Tips; Friday - Finish Off Day; Saturday - Start Something New; Sunday - Anything Goes
These themes are not hard and fast and will be changed if I feel the need.

Saturday 31 August 2013

You can do it!

This is my second post of the day.  I would not normally do two posts, but I did want to share this one soon.  As you may have gathered, I am a big fan of Clarity Stamps and Barbara Gray.  That is because of the great quality of all they produce, and the great teaching you get from Barbara.

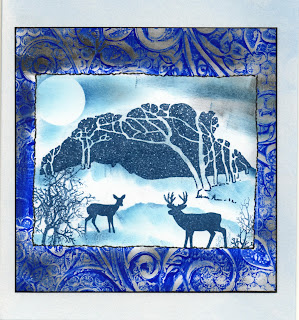
This card is no exception but was done in a rush to test out a theory.  I had received a comment from someone who felt they could not use a Gelli plate as they only had the use of one hand.  From my very limited experience of using the Gelli, I thought it might still be possible, so off I went to try.  I am stubborn in the extreme as my children and friends will tell you and I hate being beaten.

I started from the very beginning, getting the card and the Gelli out one-handed.  I followed the lesson Barbara Gray did with us at the Wollaton workshop.  Using the card ready cut for the 6 x 6 Gelli, I put one piece under the Gelli plate and, realising that keeping it still with only one hand in use, I put a couple of bits of low tack tape to hold the card onto my desk.  The Gelli does not move on the card so that was fine.

Then I assembled all the bits and pieces I would need.  The acrylic paint dries very fast so you do need to be organised.

Ingredients:
6 x 6 Gelli plate
Ready cut card from Clarity (this included the main piece of card and the small centre piece needed to create the aperture)
Card to put under the Gelli (this can be kept to reuse for future projects)
Stencil of choice (I used the Ocean Swirl from Clarity - the first one I came to)
Piece of sequin waste
Blue and gold acrylic paint
Speedball brayer (others may cut into your precious Gelli)
Copy paper
Sharpie pen - black
Micron pen - black

1. Put a large pea-sized blob of blue paint on the Gelli plate and then spread it evenly with light strokes of the brayer (I also mixed a tiny bit of gold acrylic paint randomly)
2. Put your chosen stencil in place on top and then the sequin waste on top of that.
3. Place a piece of copy paper over the top and smooth over with your hand.
4. Remove paper and stencil and sequin waste.
5. Place the small piece of card in the centre of the Gelli.
6. Place your main card on top and press down with the flat of your hand,  Once you have pressed down well you can smooth over the back of the card to ensure you get a good image.
7.. Now pull one corner and pull the whole piece of card up and off.  The weight of the Gelli plate helps to keep that in place.
8. Remove the smaller piece of card in the same way.  This can be used later as part of an ATC or for a gift tag, or anything else that comes to mind.
9. Stamps of your choice for the central image - I used the Winter Wonderland set from Clarity as I knew it would fit into the aperture

You should now have the main piece of card with a clear frame in the middle into which you can stamp the design of your choice.  The sky was done with a make-up sponge and blue Adirondack and a moon mask (made from post it note), and I used the same technique to do the hills and shadows and to "ground" the deer.

I changed the colour of the frame slightly by using a make up sponge and rubbing Willow and a touch of Black Adirondack across it.  I finished off by trimming off the bits of the edge I had messed up slightly, then edging the whole piece of card with the Sharpie pen to give a black edge.  The micron pen was used to do a squiggly line to frame the central image, before sticking the whole thing onto a ready folded card.

I do not pretend to have invented any of these techniques - they are all learned from Barbara Gray.  I know that I would make a much better job of this card with more practice. I am only a novice at using the Gelli plate, but I hope I have convinced you that if you are one-handed for any reason (broken wrist or other damage) you can still use these things with a little more planning and practice.  Remember that it is mono printing so you never know exactly what result you are going to get, but  you then just think how best to use your result.  You do have some control, but do not expect to repeat any image perfectly again.  They are all unique masterpieces.

I sent this card off to Barbara Gray as a homework piece with an explanation of how it came about, and was amazed to see it shown in the homework section on Saturday.  I was even more amazed that it got there in time, thanks to Royal Mail, as I missed the post on Thursday so it did not leave until 5.30pm on Friday.
Clarity Workshop - Project 4


The final piece was working with laminating pouches and alcohol inks.  This was perhaps my least successful piece of work, but, again, I know where I went wrong, and in my own defence, I was absolutely exhausted by then.  I am looking forward to playing more, using the basic technique we were taught.  I found problems in judging how much ink I needed, and how to blend it.  I shall be going back to the DVD's of Barbara using them to remind me of what to do.

I do understand how to position the stamps on the background, using tracing paper, but I need to do a lot more practising, and take a lot more time to play and get the effect I am aiming at.  Many of the other ladies did some really stunning creations, and Barbara's was totally awesome with beautiful hollyhocks.

This is the last of my Clarity offerings from the Wollaton Workshop.  If you get the chance to go on one of Barbara Gray's workshops or are not sure whether to go or not, just do it.  You will be blown away, however good you are or even if you are a complete beginner.  All levels are catered for, and no-one gets impatient with problems.

Friday 30 August 2013

Clarity Workshop - Project 3

Number 3 was back to the silk art card and a lesson, using the splodge away mat to create perfect reflections - mine was not perfect, but I now know how to correct the problem.  The writing should have been in the sky, but because I misplaced the reflection to start with, Barbara suggested it would have to go into the water.  Again, there were as many versions of this as there were people in the room, but we all learned loads of technique.

The reflections were the first bit to do, by stamping the castle and bridge onto the Splodge Away mat, then pressing the card on top of that print.  It naturally softens as true reflections would.  The you can turn your card round and stamp the main images above them, matching up the designs.  I was not as careful with this as I would have liked, as you can see.

Then, we used the Letterbox Kit to set up the writing.  Then that was masked off to keep them white while all the colour was added.  Again, my positioning was not perfect.  I should have been more over the top to see through the clear mounts properly.  Next time .....  It is all a learning curve.

The clouds were created by loading wisps of cotton wool with Versamark and pressing them onto the white silk art card, by brayering them, after covering them with a piece of copy paper.  Then, after removing the cotton wool, you can brayer your colour over the top.  When your colour is right, then you can use a piece of kitchen roll to polish your clouds.

The water is created by scrunching a piece of cheap copy paper thoroughly, then opening it out.  Pick up the ink from the Splodge Away mat on the brayer, run the brayer once over the paper and then you will find it has picked up the texture and you can run it a couple of times across the water area..  The hill was added after, using a make-up sponge. 

Once you have finished all colouring, then you can take a piece of kitchen roll to polish the card to a brilliant shine.  If you are going to use a pen on the card, make sure you polish first.  How do we know that?  Oh yes, been there, done it and then cursed.

Thursday 29 August 2013

Clarity Workshop - Project 2

Project number 2 with Barbara Gray introduced some of us to the Gelli plate for the first time.  I was one who had been very uncertain of how useful and interesting it would be. By the end of the exercise, I was totally hooked and fired up with lots of ideas on how I could get my money's worth from it.
This time, we were using acrylic paints, something else totally new to me, and it is frightening how fast it dries.  However, Barbara does not believe in wasting anything and has come up with several different ways to recover a potential masterpiece which is trapped on the Gelli plate because it is too dry to pull the print.  You do need to remember that you can never repeat a design.  Each one is totally unique, and it was fun looking round to see the results that everyone else had achieved.  The first task was to pull just a simple print, using a stencil and sequin waste to provide the pattern. 


Then we progressed to using the centre mask to give us an aperture through which to stamp.  The apparent wasted piece of card with the rest of the design can then be used as part of another project, perhaps as a backing for an ATC.  Barbara also taught us how to do an awesome moon mask and how to change the look of the frame with the addition of Adirondacks inks. 


This is just one way of cleaning the Gelli plate and using every little bit of ink left on the plate.  Several of us still had a faint image (an echo) left after we had pulled our print, so Barbara added a little bit of lighter colour acrylic spread over the plate. Then a piece of cheap copy paper was used, rather than the expensive paper, to pull this soft print - perfect for a backing paper.  Being very absorbent, copy paper just sops up all the remaining ink.
One very important tip that Barbara gave us was the care of the Gelli plate.  Always store it as it came in its original packaging, but also massage a little baby oil into it every so often to keep it in good condition.  The kind of acrylic paints used are also important and Barbara has decided that the creaminess of the Daler Rowney range works the best - and they are British made too.

Wednesday 28 August 2013

WOYWW 221

This is definitely the best crafting blog and should get an award, if there were justice in the world.  If you agree with me, then go to https://www.surveymonkey.com/s/CMVZM9C  and vote for it.  You just have to put the Stamping Ground link into the "Other" box to register your vote.  If you are confused about what WOYWW is all about, I can do no better than to direct you to Julia's blog site at Stamping Ground, where you will find all the info you could desire.   Julia does like us to be brief in these posts, so I have posted each project in a separate post throughout the week.

I had to miss out last week, being away on my long awaited Clarity Workshop with Barbara Gray, a really genuinely lovely lady, even better "in the flesh" than on the TV.  Her assistant for this workshop was Maria Simms, so patient and helpful.  We had four separate projects to complete, as I said in my earlier post this week.  Number 1 was in yesterday's post, and the others will follow throughout the rest of the week.

Having the Clarity shop on site meant that my credit card took a heavy beating, like everyone else there.  Stamps, stencils, masks, inks, paints and Perfect Pearls were just some of my purchases that you can see on my desk in my last photo.
All my new stash together

Alcohol inks and a free pack of superb tracing paper

My lovely new Gelli plate and the acrylic paints to go with it

Stuff to use with the Gelli plate - Clarity stencils and sequin waste

I resisted the urge to buy every stamp in the shop, limiting myself to one set and two separate stamps, together with two Adirondack in pads, which I truly NEEDED to practice a couple of the projects
These photos were taken on Tuesday afternoon, after which I did manage an hour to play a little with the Gelli plate.  The first print was total rubbish so I had to just sit and think for a minute about all the tips that Barbara had given us, and the next couple were just what I was aiming at.

Anyone who is dithering about getting a Gelli plate, go for it, but try to watch Barbara Gray first - her Classroom videos are available to watch on Create and Craft, and are well worth the time.  I now have so many ideas buzzing round in my head that I want to play with, there are not enough hours in the day.

Now I must apologise to Julia for such a long post this week, but I just could not leave anything out.  Sorry, Julia.  I will send everyone over to you now to continue their visiting.

Tuesday 27 August 2013

Clarity Workshop - Project 1


This was the first of the four projects we did at the Wollaton Workshop with Barbara Gray.  This used the Tall Trees stamp and one of the tiny texture stamps.  All equipment was ready for us to use and Barbara gave us the mask for this project to keep for our future use.  We used Adirondack inks, a brayer, the Splodge Away mat (essential for easy brayering), Clarity silk art card, a black Sharpie pen and a black micron pen.  Mine came out as quite soft colouring, which I actually liked, but many of the others achieved much more intensive colouring, which was just as lovely.

An added bonus was a lovely, ready printed card for us to use to mount it later if we wished.  I might be wrong, (sorry if I am) but I think it was Dee Paramour who designed this mount for us. Barbara also taught us her clever way of making a mushroom from a make-up sponge to add colour in the right place - really neat, that.

The finishing touch was to use a micron pen to add the black dots round the border, which really made a huge difference, and is a much more cost effective way of creating the appearance of matting and layering.  The black edge round the outside of the whole card was easily created with an upturned ruler and a black Sharpie pen.

I will be back later in the week with the other projects from that day for those who are interested.  Meanwhile, I am off to have another go at some of the things I learned.  Can't wait for the workshops next year to learn more.

Monday 26 August 2013

Clarity Workshop at Wollaton

Last week was totally chaotic for me and I am only just recovering from rushing around here and there.  Monday was collecting my gorgeous new car, and the shock of filling the fuel tank.  Tuesday was waiting around for the man from Tracker to turn up to fit the system, and then trying to pack all the things I thought I might need, and spending long sessions just sitting in the motor with the handbook, so that I could find the basic things like wipers and lights etc.

Rosie, picking blackberries
Wednesday was an early start, heading south to Evesham to drop the dogs off in kennels before turning round and retracing my steps to pass my house on the way up to Derby.  A slightly more stressful journey than usual, trying to get used to driving an unfamiliar vehicle.  The day was great, though, with all four grandchildren together, playing beautifully with the older ones generally taking good care of the littlies. 

Big kids joined in too

It is a beautiful spot, right on the edge of the city with lovely views over the valley.  We finished the day with a barbecue, after which I then drove through the rush hour traffic to the Travelodge at Wollaton Vale, chosen because it was only a couple of miles from the Community Hall where Barbara Gray was staging her workshops.  The hotel was probably one of the better Travelodges, and, certainly, the staff were very helpful and the room was perfectly adequate for a night's sleep.

Thursday started with a bit of a panic as I overslept and just hurled my possessions back into the case and bags and staggered out to the car.  I just made it in time and was met by Barbara's fiancé, Dave, who was kind enough to park my car for me to save me the hassle.  He gathered all the things I needed and took them in for me.
Now, where shall we put the tent?

Barbara is just as lovely as she appears on the TV, and greeted me with a big hug and took me into the hall to find me a suitable place.   Barbara also had help sorting us all out from the lovely Maria Simms, fresh from her sellout programme on Create and Craft the day before.  The Workshop itself was very full-on, but totally inspiring, and I learned so much that day.  I cannot wait to put it into practice.  

We had four separate projects to complete in the day, with different techniques in each, including a session with the Gelli plate.  That convinced me that I would get plenty of use from it.  Needless to say, my credit card took a severe beating in the shop that day.  I will post pictures of my goodies and the projects later in the week, but if you stampers our there get the chance, go on one of Barbara's workshops.  They are worth every penny.  The preparation is superb and the teaching inspired, and with both Barbara and Maria to sort out any problems, we all achieved great results.  Even our mistakes were used to help us all. 

At the end of the day, we all piled into the shop to pick up final goodies and pay the bill.  Then it was back out into the rush hour traffic to get back to Derby, where I was duly fed and watered.  A nice glass of wine completed the day perfectly before bed.  Friday was a good day, although Steve was unfortunately at work and did not get home until long after I had left.  My lovely daughter-in-law made me very welcome, taking me out to visit her parents for lunch.  I finally left later than intended, but it seemed to work as I missed all the worst of the holiday traffic.  Even the horrid island by the Belfry to get onto the M42 was quiet, and the motorway flowing well.  The car went well and is just so comfortable.  After unloading, another glass of wine brought my stress levels down again before bed.

I have already decided to do the Wollaton Workshop again next year, and I intend to do the 2 day retreat in May.  It was just what I needed to spark the creative juices again, with loads of hints and tips to try out.

Sunday 25 August 2013

Warning - Scary Monster Alert!

Scary or what?  Why am I being plagued by these great monsters?  This one was too big even for the dogs to take on.  Gemma tried and then backed right off and would not go near it again.  I finally managed to corner it with my turbo powered spider catcher (from Amazon).  Even that was not easy, trying to gather up all the legs so I could put the bung in the tube. 
I just hope it does not walk back from where I let it go.  If it does, you will hear the scream throughout the land.

Wednesday 14 August 2013

WOYWW - 219

 So sorry if you are calling in here to see crafting work, but life took over this week, and no crafting has been done.  So, rather than showing you the same photo as last week, I thought I would show you my new toy - a bit bigger than Cuttlebugs or Cameos etc, but totally luscious, and I cannot wait to get it in my sticky mitts.

I finally got to drive it this morning and my smile was from ear to ear.  Just one item to be put right, new seat covers to get and I can have it.  My only problem is to make my existing fuel last till then so I fill up the new one rather that the old one.

I am seriously impressed by the insurance company who actually emailed the changed documents to me within an hour, so now I can go out tomorrow and tax it (another mortgage required).

My workdesk this week is really my whole house and my life.  The first list of jobs, including the big one of the whole roof, is complete and the second list well on the way.  That includes the base for the new greenhouse, rehanging a door, a new stair gate to keep the dogs penned upstairs with me, a new banister rail, a new door for the gas meter box, and two new cupboards in the porch.  I do have a third list to follow.  At the moment, I have yet another skip on the front drive, together with a huge van, which swallows up mucky, hairy dogs and spits out sweet smelling shorn dogs.

This the first one, all clean and fresh for the moment - not sure how long it will last, though.  I am sure her first task will be to find a muddy puddle.

For those of you still reading, it is time I directed you to the head teacher's office, which you will find by following the bottom corridor till you find this link.  Miss Julia will have a lovely long list of real craft desks for you to inspect and enjoy.  Have a good week.  xxx

Wednesday 7 August 2013

WOYWW 218

If you are wondering why I am showing you such a messy craft room, I can only refer you to our leader and her explanation over at Stamping Ground.

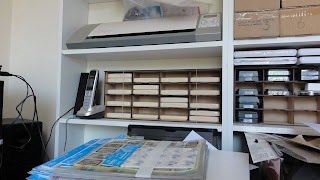
The pictures, as usual, this week are taken in the late Tuesday sunshine, but there has been no crafting yet this week.  I think my desk this week is even messier than last week.  My excuse is that I am reorganising things, gathering the things I use most to a space closer to me, and moving others further away.  I have this nagging feeling that this might cause me to ignore the things I have moved further away, but only time will tell.  I have one or two punches, Martha Stewart and EK for example, which you might pick out in the mess.  I am trying to find those a space within reach in the hope that they may enable me to use us some of my snippets when I get time to play.

This second photo shows that my collection of ink pads is growing slowly, to the extent that whenever I need to use one, the whole stack collapses.  Hence the new storage units.  I think you are only supposed to put one in pad in each space, but two fit quite comfortably, although I now need to label them on the side as well as the ends.  Below the left hand unit, there is a little pile of Dufex, which I bought earlier this year in a sale.  How sad that Dufex is now no more.  Can I bear to use what I have, knowing I cannot replace it?  Probably, but only to special people, I think.  Anyway, that pile is waiting for me to put it away into the Dufex box - meanwhile it sits on top of and hides my printer.  I have been asked what Dufex was.  It was the most beautiful reflective foil printing for decoupage and topper.  It was produced in such a way (using a wax technique) that it caught the light and reflected it back wherever it was in the room - perfect for Christmas.  Just a small topper would catch your attention.  I found this description by Googling it -
Dufex isn't foil and it isn't holographics, it's something different - it's a special foil material with colour reflections.
The reflective and faceted surface of Dufex will really make any craft project come to life.
Hand engraved designs or patterns are embossed onto foil sheets to create the distinctive Dufex quality of depth and movement.  This is achieved through the diffraction of light on the image surface.

This week has been a bit mixed, both emotionally and practically.  It should have been our wedding anniversary last Friday and I chose to spend the day on my own with my thoughts and memories.  My family were good enough to respect my choices and waited for me to contact them.  I did start the reorganisation of my craft room as something very positive - positively messy!

Now that the roof is finished, I can take a breather before the next lot of jobs that need doing.  Having said that, yesterday (Tuesday) had to be a clear out of the conservatory.  The heavy rain storms of the last couple of weeks reminded me that there was a leak from the roof light in the conservatory.  So I have now called the company in to sort it out, and they are coming to look at it on Thursday.  It would be useful if they can get somewhere near it, so that put the conservatory a bit higher on the list of places to be sorted.  Thanks to my army of helpers (daughter and two grandchildren) it is unrecognisable and much more inviting to sit in.

Thank you to all those who were kind enough to leave a comment last week.  I was quite pleased to succeed in getting back to all of you, bar one, where I had a problem.  I was asked to join another group, which made me very wary, so I backed out of that.  So, if you were the person I missed leaving a comment for, I apologise and that is the reason.  Hope to see as many of you as possible this week.

PS Having just told everyone that Dufex is no more, I had a wander round the internet and found that it seems that the company has been resurrected, and there seem to be a lot of new and discontinued designs available at 
 http://www.moonstonetreasures.com/Dufex.html?gclid=CMqa0M_D67gCFZMQtAodvg8Arw  Needless to say, I succumbed to some of the beauties on offer there.