
Sunday 31 October 2010
Sewing a card
Notelets

A Thank You Card

Thursday 21 October 2010
I love learning new things

As as result of this, I now have a "little list" of new tools I really NEED. They will have to go on my Christmas list for a couple of years, I think.
Friday 15 October 2010
My desk!!!!

I have just finished my latest batch of samples, so I need to spend a concentrated session getting to grips with the rest of the birthday cards I need to do for this year, do a few more Christmas cards (having found the box with my Christmas stash in). Then I want to sort out all my stamps. I have some totally unused because I could not find them when needed, so an index is needed with a much better system of storage for them.
Indexing is also needed on the computer to enable me to find the actual file I need for a given project. All my prerecorded bought discs are copied and stored on the external hard drive for ease of use. My problem is with the mountain of other files accumulated over the years - photos, decoupage sheets (some mine, some bought or downloaded from others), parchment designs etc. The trick is to sort them properly without losing them. What fun!
Sunday 10 October 2010
Manipulating images
One minor gripe I have with My Craft Studio is that it does not handle pdf files. This may not sound very interesting but when you have a lot of discs where all the images are in pdf form and you want to manipulate one of them to create a different format, it can be irritating.
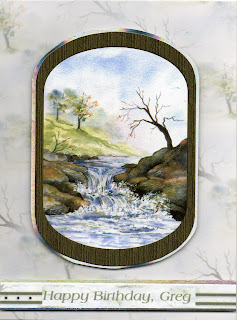
 I have got round this problem using another program to convert the pdf to jpg format. For this card, I took the image and the insert from the latest Joanna Sheen / Pamela West CD, and copied them into Roxio Photosuite, then saved them as jpg's (make sure you know where you have saved them to on your computer - you can waste hours trying to find missing images). From there, I was able to then take them into My Craft Studio, and resize them to suit my needs. The image on the front is as designed by Pamela West, cut out and mounted onto holographic card, and then onto the backing paper. The insert was resized to fit the card I had, then I digitally punched out an oval, into which I put the text. With My Craft Studio, you can match the colour of your text to any part of your design. I picked the darkest part of the twigs, and then darkened the text a little from that to make it stand out but still tone in well. To get the sentiment strip across the front of the card, I cropped the insert to keep just the section with the vertical lines, then turned them through 90 degrees to go across. I found that I could not get the text to show up satisfactorily on that background, so I went back to the insert and cropped out a small section of the main background, and digitally placed that on top of the strip with the lines, put the text on top of that and printed it as one complete image. Both the image and the sentiment strip were mounted on the card with narrow shaker tape to give some dimension. This card was to be given by hand so I used the thicker shaker tape, but if it was to be posted, you could use the thinner tape, or just design the whole thing digitally and print it out as a flat design. I did this initially to assess if the end result would be as I wanted. Doing it on the computer first saves using expensive ink printing things you really don't want in the end.
I thought this particular design from Pamela West was a good one for a male card, always a problem to sort out, especially if your subject is not too keen on sports or cars.


I thought this particular design from Pamela West was a good one for a male card, always a problem to sort out, especially if your subject is not too keen on sports or cars.
Using what you have


Saturday 9 October 2010
My First Award

The rules for this award are:
1. Thank the person that passed it to you.
2. Copy the award to your blog.
3. Share three things about yourself that you enjoy doing.
4. Pass the award to 5 others.
3. Share three things about yourself that you enjoy doing.
4. Pass the award to 5 others.
This is my very first award, so thank you so much, Shaz. It is very much appreciated and really made my day.
My 3 shares are
1. Rubber stamping, combined with parching (embossing stamped designs, especially the circular ones)
2. Teaching our nutty spaniels new tricks.
3. Reading - almost anything, particularly about animals, although like Shaz I do enjoy a lot of fantasy fiction.
Now for the 5 people I would like to pass this award on to
1. Viv at Viv's Visuals
2. Jennie at The Artistic Stamper
3. Eileen at Eileen's Crafty Zone
4. Julie at Inspirational
5. Estelle at The Stampsmith
There are many others out there, whose work has been really inspirational, but I was only allowed 5 this time. Every problem or query I have had, I have been able to sort out by looking at someone's blog, and asking a forum. so thank you, all of you, and please carry on being so kind and helpful.
Monday 4 October 2010
More TV cards


This is another of the Christmas Parchment sample cards, but this one did involve the use of parchment. I took one of the designs for a Christmas bauble, and enlarged it, before printing it on parchment. I embosssed all the straight lines, round the edge, and round the top and leaves, then cut it out with scissors. I coloured the leaves and berries on the back with Derwent water colour pencils, then attached the parchment to red mirri card, which was also cut to give a narrow border. Then I matted it onto gold pearlescent card, adding a ribbon bow and peeloff message. I used a quickie glue pen to put a tiny dot of glue on all the crosses, sprinkling fine red glitter to bling things up a bit.
This card got picked out twice, by Leonie and Sandra, and then by Stephanie, so that was another boost for my ego. I think it was chosen to show that even beginners can do something worthwhile with parchment.
TV Debut

This card is one of the batch I sent in, and involves the use of one of my favourite techniques with acetate and is being shown by Stephanie Weightman. The image was first printed on plain white card (supersmooth), then flipped and reprinted on acetate as a mirror image, sprayed with adhesive (Crafters Companion Stick and Stay). The two images were married up with extreme care, then matted and layered on holographic mirri card, then the starburst background, created from the main image, then holographic card again before sticking the whole thing onto supersmooth card, and embelishing it all with peeloffs, and a suitable insert. I really liked the carol toppers on this cd, which gave an element of the religious part of Christmas without upsetting the less religious people. I created the insert from one of the backgrounds, matching up the colours and designs on the screen before printing anything.
Subscribe to:
Posts (Atom)