Welcome to my blog

I hope you enjoy reading my posts, and please leave me a comment. I always enjoy reading them, and will try to visit you in return.

For security reasons for me and for you, I would appreciate it if you would leave your name on your comments.

You are welcome to copy any of my designs, as long as you do not take credit for them yourself. I am very happy for you to sell them. If I have used anyone else's design, I always try to give credit where it is due. If I have missed anything, please let me know and I will put things right.


This is intended to be mainly about my crafting stories, as a personal record of what I do. However, I interpret crafting quite widely, not just paper crafting but other things too. I have a butterfly mind and like to change from one thing to another depending on what I feel like on a given day - knitting, crochet, cross-stitch, cards, baking and several others, including my favourite right now, parchment, both traditional skills and Groovi, very relaxing and calming to do.

I have decided to put some structure into my blog so that each day will have something of a theme.
Monday- for Mindfulness; Tuesday - Tidy Up Day; Wednesday - What's on Your Workdesk Wednesday; Thursday - Technique and Tips; Friday - Finish Off Day; Saturday - Start Something New; Sunday - Anything Goes
These themes are not hard and fast and will be changed if I feel the need.

Wednesday 12 October 2022

Tribute to a special lady

 I am ashamed to see that it is around two years since I posted anything on my blog.  However, I felt that this week was important to come back.  Many of you will already have heard the sad news that we have lost another friend in crafting - Debbie Rock.

Debbie was a talented crafter and a valued friend. I first met her in a caravan at Eastnor Deer Park, just outside Ledbury, Herefordshire.  We were all there to enjoy Land Rover trialling and the great social life around the barbecue in the evening.  Debbie was there because her parents were long-standing club members and her husband, Phil, was the Treasurer.  I remember Debbie's mum, Gwen, was so proud of her daughter's crafting talent, and would show anyone visiting her caravan some of Debbie's latest work.

It took a long time to get to know Debbie because she never pushed herself forward, but she was so well worth getting to know her.  She was one of those rare people that you could talk to while knowing that your conversation would remain totally private.  She was a listener rather than a talker.  After my husband died very suddenly, I started to go to crafting workshops, and Debbie often came with me.  During our travelling together, we would chat about anything and everything, not just crafting, but anything that concerned us.

It is no secret that Debbie's family was the centre of her life, and she was so proud of their successes in life.  She loved nothing more than to have her nephews and their young children around her.  

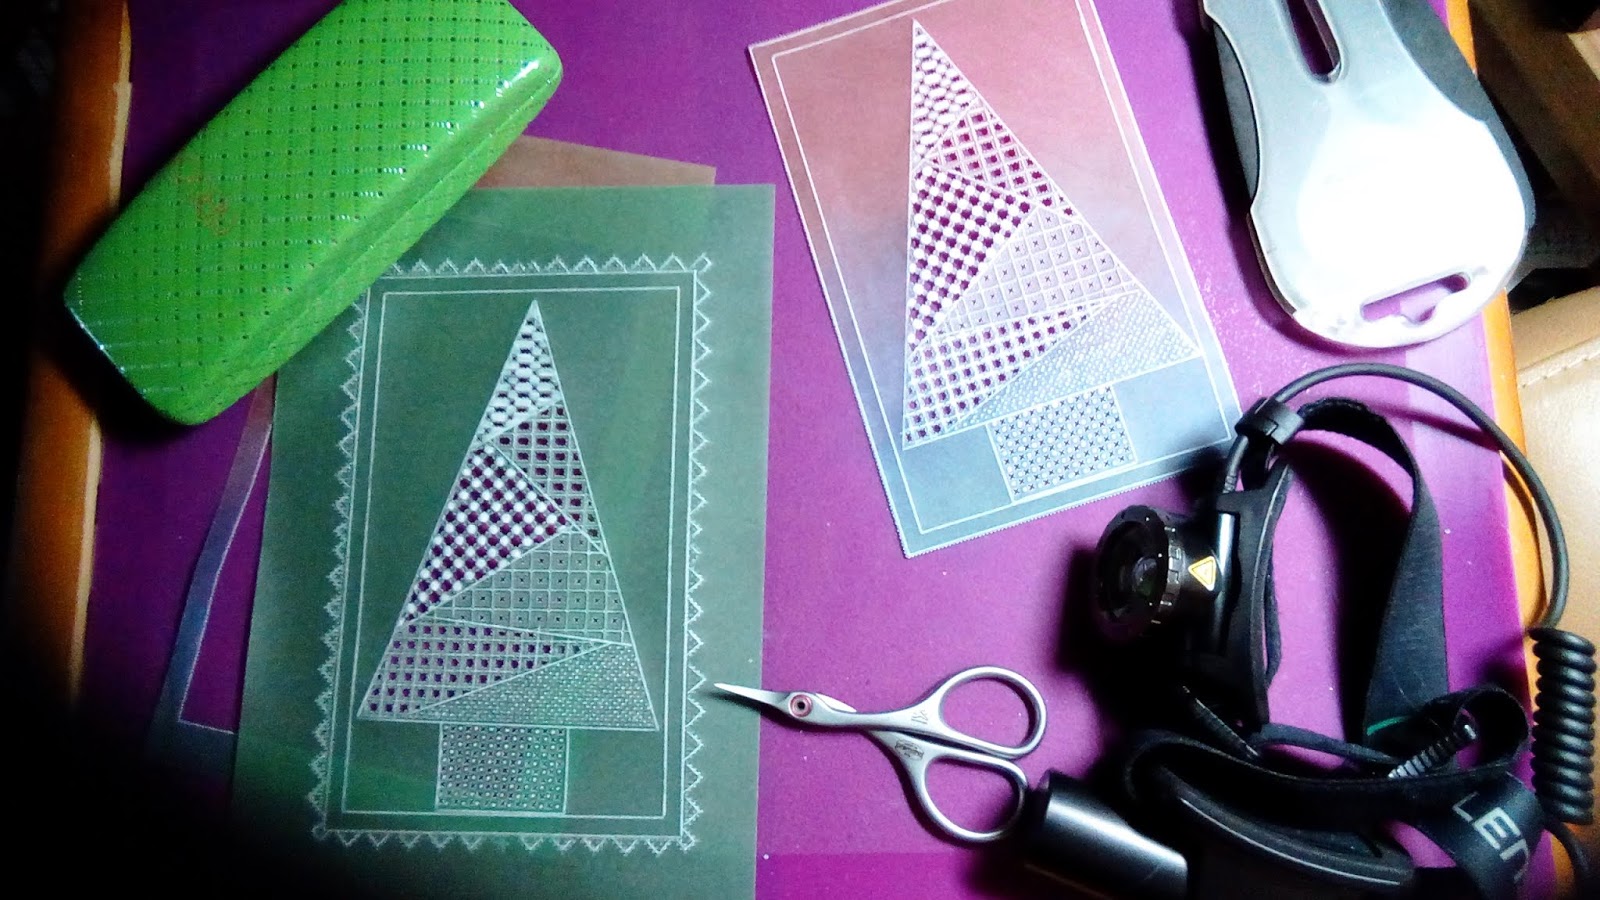
Apart from her family, Debbie's other love was crafting.  Debbie and I had totally differing crafting interests.  Mine was stamping and parchment craft.  Debbie, on the other hand would bite the hand off anyone who was getting rid of an old redundant computer, and then turn them into masterpieces, and I believe she would raid her husband's (Phil) stash of Land Rover bits and pieces.  I could not get to grips with what she did.  If I was presented with the same heap of things as Debbie, by the end of the day, I would still have a heap of  apparent junk, while Debbie had something special.  I did try but never produced anything I wanted to keep.  Debbie did try hard to get to grips with my favourite craft of parchment, but it was not for her.  We each settled to appreciate  what the other did.

Debbie would do anything she could for anyone, producing wedding stationary, glorious wedding and other celebratory cakes.  She could have made a successful business, but never believed she was good enough.  No matter what any of us told her, that she was really talented, she never believed us.  The loss of her mother and later her father further reduced Debbie's self confidence.  She always thought she should have done more.

She hated photos of herself, and never really understood that she was beautiful inside and out.  She had a smile that would light up a room.  A really lovely person.

RIP Debbie

Friday 19 March 2021

A tribute to a special lady, and a special crafter

 It has been a while since I wrote on my blog, but today is a special day for many of us for those of us who knew Shaz Silverwolf (Sharon Brooks).  A talented crafter, so generous with her tips and techniques.


Today was the day we all said goodbye to her earthly life but she will live on in our hearts.  A perfect send off for Shaz's spirit, allowing he to fly free with the birds into the beautiful countryside outside that window.   As we get older, sadly it is a place we visit more and more frequently, but that view does calm the spirit, even though we cannot all be there.

On a personal note, I owe a lot of my crafting life to Shaz.  She inspired me to start my own blog and I learned a lot of brilliant techniques from her, for which I will always be grateful.

 RIP Shaz Silverwolf.  Long may she live on in our hearts and memories.

Thursday 6 February 2020

Bold or fine?

I have really enjoyed the two Pergamano shows on Hochanda today.  I always enjoy them but today's shows were right up my street.  I have to emphasise that everything I write in this blog is my personal opinions and thoughts.  Everyone is entitled and right to make their own decisions.  We are all different and should be.

A PTC using a grid design from Josie Davidson, but done with a fine grid

It is no secret that although I love dabbling in lots of different crafts, my favourite is probably parchment work.  I am no expert but I have been doing it for many years.  It was a no brainer to join in the Groovi journey, and even more obvious that I needed to find someone from whom to learn the finer points of the craft.  I was fortunate enough that Linda Williams put Lynne Bishop and me in touch with a lovely traditional tutor, Pat White.  She soon took us in hand and started to tidy up our faults and stretch our knowledge.

Because the multi-needle tools are fine (thinner and closer together), I never really did much with the bold tools.  In fact, I never use the two needle and four need bold tools.  The single needle bold tool is an important part of my kit, but rarely used for its original purpose.  I use it to make the holes to insert the tiny Clarity brands and remove glue that has dried in the nozzles, and other non-parchment things.  It is often seriously misused.

I can cut picots with holes made with the bold tools, but I am never satisfied with the results, whereas those created with the fine needle tools are, for me, much better.  One very good reason is the increasing cost of postage.  We now have to pay extra for 8x8 and 7x7 inch cards, so it makes sense to reduce our designs to smaller sizes, unless they are hand delivered. 

Because of the fine multi needle tools, I could never see the point of mixing in the bold tools.  That just did not make sense to me.

I do have a bit of a reputation of changing designs set for a workshop, and one of my regular changes is to convert bold grids to fine grids.  Yes, it takes longer but I enjoy doing it and it gives me satisfaction.  No argument for me.  I am fortunate in going to classes where the tutors know me and are happy for me to interpret things differently.

One argument for the bold tools is it is easier to see what you are doing, especially if you have eyesight problems.  I have developing cataracts which are causing me some problems these days, not least with the need to replace my two pairs of glasses very frequently.  I do make sure that I take my parchment work to every eye test to ensure that I get the best prescription for that work.

Two years ago, I was so frustrated and thought I was going to have to give up all gridwork.  I tried different types of expensive and cheap magnifier and lights, but nothing seemed to work for me.  Even bold grid work was impossible.  Then I picked up one of the many head torches we had scattered round, management only used for taking two black dogs out late at night on unlit caravan fields.  I had a sudden flash of "Clarity", and tried it with a bit of gridwork. 

It was a revelation, a real game-changer.  I could see everything I needed.  I now have two head torches, rechargeable from the mains or from a power pack.  Each one will usually last for a full day at a workshop.  They are not cheap but they allow me to continue the hobby I love.  My make of choice sits comfortably, not too heavy, can be angled to spotlight exactly where you are looking.  The intensity of the light can be adjusted so that it is comfortable for any environment.  I do get the Mickey taken about my appearance, but I don't care if it allows me to carry on.

Photo taken by Barbara Gray at a Leyburn workshop.
You can laugh all you like but I can continue with fine work like this one.  This is a traditional design, traced in the old way, and then each butterfly divided into sections for different designs of grids.  A bit fiddly, but with proper prescription glasses and a really good head torch, I can see it all clearly, even with cataracts.


I did a couple of Christmas cards using one of Tina Cox's designs


, then while I was looking through the Clarity member's sale, I realised it had been turned into a Groovi plate.
https://claritystamp.com/collections/groovi-1/products/tinas-embroidery-christmas-trees-br-a5-square-groovi-plate

Here's a challenge for you.  Draw out two outlines of this tree from Tina,  divide it up in sections and create different grids in each section.  Do one tree with the bold grid and the other with the fine grid.  Then show the results, good or bad, on Facebook, and decide whether you are a bold or fine person or a mixture of the two.

The question in the title was asking how you prefer to work, with the bold grid and tools or the fine ones.  I am curious to know how everyone else feels.  There is no right or wrong answer.  As I said, we are all different and we must choose our own way.

Thursday 5 September 2019

Thirsday - Techniques and Tips

My blog is likely to die from lack of use right now.  Life has definitely got in the way just lately, but I have still been crafting.  These are two cards I did for a friend's 50th wedding anniversary, quite a special day.  We spent 7 years at school together, and although going to university and college meant we did not see each other as frequently, we never totally lost contact.  Over the last 15 years or so, we have made determined efforts to meet at least once a year, taking it in turn to host the get together.  This was an extra meeting.  Sadly the two who live down in Dorset could not manage to get there, so I was charged with getting the present from us all and delivering it, which is why there are two cards.

This is the card from me, which owes a great deal to Maria Moorhouse and her workshop at Evesham.  Sitting working at this design, I realised that is had a lot of lovely hearts on it - perfect for an anniversary card.  All I had to do was to finish it and add their initials in the centre from one of the Plate Mates - job done.


 Well nearly done anyway.  This second picture was from the main part of the insert.  The main part of this was done on the coloured Clarity designer parchment.  I cannot remember which design as it ended up being whatever I had close at hand, being rather short of time by then.  I used the lovely Jayne Nestorenko frame and the centre panel had the writing from the same Plate Mate as the centre of the front panel.  All the gridwork  and edge picot was done with the fine grid, which you may already have gathered is my favourite way of doing it.  


 These two cards took a lot of the designer paper, but for  such a special occasion, it was worth while.


The third piece was used as the other insert piece for me to write on.

The second card was one I had already basically done and just had to add the insert pieces.  By now I was running out of time so there was no time to start from scratch.  This was to hold the gardening vouchers we had bought for their gift.  Some of you will know that this is based on one of Tina Cox's lovely embroidery plates.  I added a corner of embroidery to match on the card itself.  The "messy " bit inside was hidden by one of the insert pieces of designer paper.
 

The insert for this card was slightly problematic as I could not find a piece of designer paper to match the front.  The nearest I could find was a little on the blue side, so I took a dark green Faber Castell polychromos pencil and coloured the back of the paper until it looked more green.


I know that the amount of work in these cards will be appreciated and it is a special occasion  The party was lovely and we were able to sit outside and enjoy the sunny weather, while looking over the stunning scenery to the Wrekin.

Thursday 8 August 2019

Thursday should be tips and techniques

I have been holding these back until today until they were officially launched by Paul Church on Hochanda today.  I really love this new plate from Linda Williams for Clarity Stamp (https://claritystamp.com/collections/as-seen-on-tv/products/lindas-heart-sampler-br-a4-square-groovi-plate?variant=29312116457520)


Having watched the shows so far today, the design team have done a fabulous job and produced so many different ways of using this lovely plate.  I chose to work on small cards (cheaper through the post) and had real fun with them.  With this first one, I took a part of one heart and extended to create a slightly larger border with the criss cross design.  I was aiming at something to suggest tartan and coloured the border before perforating and snipping in between.  I backed it with one of the Clarity designer papers.  It took a while to find the right backing for all of these.  

When you have spent a long time and a lot of care working on a piece of parchment, never rush to stick it down.  So many pieces have been ruined by using the wrong backing paper.  If you use a very light colour behind the parchment, you risk totally losing all your embossing work as it disappears into your backing.  Spend time placing your piece on top of different types of background  Many experts suggest that you should choose your backing before colouring your work, but that does not work for me.  My brain is not that organised and my pieces of work tend to develop as I go and finish up miles away from the original idea..  That is just the way I work.


I love the design in the centre of this heart and it reminds me of quilting   I kept totally to the whitework as I did not think it needed any extra colour, particularly with the narrow frill round the outside.  I really love the frill design.  Remember that there are two parts to embossing a frill.  You need to decide which part is sticking up and which is going to the back.  The bits that go to the back should be embossed from the front, but only very lightly and with a thin piece of cellophane between the ball tool and the parchment.  That  prevents the parchment getting shiny on the front which can look ugly.  The bits that are coming to the front are embossed, as normal from the back.  Make sure you work right from the outer edge inwards.  There should be no gap between the outer edge and your embossing, but fade it slightly as you go towards the inner edge.


I like this next one a lot as it gives me the impression of more depth.  I coloured, perforated and picot cut the small heart before backing it onto the designer paper.  Most of my perforating and snipping is done using the fine grid and tools.  As a personal choice, I do not like the bold grid and tools, and with something this small, I feel that the bold grid is too big and would overpower such a small piece.  With a really good light such as my head torch, which I can focus exactly to where I need the illumination, I have no problem seeing what I am doing, despite developing cataracts.  While I am talking about light, strong sunlight is not a good situation and I really struggle to see anything clearly enough to snip or perforate in the sun.


This blue card is a marriage between the corners from one of Linda's hearts and one of Josie Davidson's plates.  It is backed on Shenandoah paper in blue, but I used two different shades of blue pencils to add extra colour,  You really need a needle point pencil to do this successfully, and keep your sharpener ready to resharpen those pencil points, especially if you are colouring on the front as I did here.


These next two were kept simple with just basic whitework.  I did not think they needed any further embellishment so they are ideal for anyone just starting out on their parchment journey.  The only thing that is slightly more advanced is how I did the borders.  I chose a couple of multi needle tools to edge them.  I cannot remember which tool this was, I just grabbed three different ones to play with.

I further decorated the border with a sun tool and a tiny dot in the centre.  I really like the effect you can get with this arrangement with very little effort.


On this one, I edged it with the small semi circle tool and put a dot in the centre of each semi circle to finish it off.


Then we come to my favourite of the ones I have done so far.


Again, I have done a lot of perforating and picot cutting, and the border is my favourite multi needle tool, the semi square.


Hope you like what I have shown you today, and get your multi needle tools out and play with them   they really lift your work and are not hard when you get the hang of them.  Don't be afraid to just play and experiment.  Have fun.

Saturday 3 August 2019

Friday/Saturday - Finishing off and something new

Some of you may have seen my post of Groovi Worldwide last week, when I showed my mishaps with one piece of parchment.  It all started when I went over to Hazel Edwards' class at her home last Saturday.  She had done some lovely samples to give us ideas, using the Silent Night plate as a base.  I was there all day so had plenty of time to play.

The first card went fine, although, in retrospect, I should have strengthened the colour.  It is a little on the pales side, but I can adjust that by adding some colour on the front of the church.


Then after lunch, I started on my second card and it all went to pieces.  Too much chat and not enough concentration, which led to elementary mistakes.


I embossed the border, then decided to do the perforation of the grid.  Mistake One - I forgot to turn it over so that meant that the embossed border ended up as de-bossed.  OK, I can accept that, not too much of a disaster until I started on the centre panel.  Mistake Two - The words were now backwards.  Right, stop, and have engage brain, if I can find it!

I was detemined not to throw anything away and to use every bit.  So I picot cut the centre panel out and then tidied up the inside of the frame.  


Then I created a new border for the panel.  It has not shown up too well on this photo.  I put a coloured piece behind the centre panel but that just has not been picked up on this scan..  a
Anyway, that is the centre panel saved with a new border.  That left the original border to be used on this next card.  I used a piece of Shenandoah in green at the back of the whole thing.  I had already embossed the border plate onto the green parchment, which threw up the border lines more strongly.


 I had intended to use my rubber to remove colour from the green behind the church and the trees, but, in the end, I decided I did not need to do that.  With the green on the trees, i was really just strengthening the existing colour.  and the brownish hue of the building seemed to come through quite well.  The ground in the front is just embossed with tiny dots from the fine grid.  Then the whole thing was mounted on an a piece of Shenandoah paper.  I chose to use the bright side as it seemed to throw up varied lights in the sky.  All my colouring on this was done from the back with extra in some places on the front.

Then I decided I was in the mood to play a bit more, so I did another, using two different pieces of parchment.   Again, I embossed the border on both pieces of parchment.  This time the border gridwork and the church were on the normal white parchment, with the background picot cut out.  By laying it over the blue Shenandoah parchment, I was able to place the moon and the stars just where I wanted them.  Fortunately, the white embossing on the top of he church was strong enough to be able to place very tiny dots of Perga Glue to stop it moving and curling.


A big thank you must go to Hazel for running such a lovely class, and for a very tasty lunch, not forgetting all the coffees made by Steve to keep us going.

Friday 19 July 2019

Friday is for finishing off

Four more parchment pieces finally finished and mounted ready for use. The first three were started at various classes, and just needed time and finishing of embossing etc.

The first one was from a workshop run by Maria Moorhouse at the Crafters Companion store at Evesham.  For some reason, this one was the hardest to find backing paper that I liked.

Number 1


This was one design that I actually followed and I think it shocked Maria, as I do have a reputation for going off piste.  It is a quiet sort of piece and I kept the colours very soft too.  To me, this makes it the kind of card that would work for a sympathy card.

The next two started life at a workshop run by Josie Davidson and Chris Walker up at Whittingtom.  Josie gives us several designs to choose from.  Rather than work through one piece from start to finish, Lynne Bishop and I tend to go through the prep work and set all three up, then settle down to develop them.  
 
Number 2
 Number 2 did contain rather a lot of dots and I think the hardest bit was trying to line them up diagonally across the whole design,  Very fiddley but give a very effective texture.  The centre section is a combination of dots and perforations, so the only picot work is round the outside border, which I did using the fine straight grid

Number 3
Number 3 has just two borders, top and bottom, of gridwork with the centre panel coloured.  For once, I used the bold grid, but because all the cuts are straight, they were not such a problem to snip.

Both these pieces were coloured with the Faber Castell Polychromos, first on the back and then on the front, with highlights added on the front.  

I think that Number 2 is my favourite.  The colours work better for me on that one.

The final piece for today uses one of Josie's royal border plates and one of Linda Williams Flowers and Lace.  I love pansies and the colours of the flowers on this one are close to one of my favourite pansy flowers called Joker.


I did the border some time ago so I cannot remember which plate it came from.  The colouring is done with the same pencils, but this time, I dorsed them on the back and the front and then added darker lines to each petal on the front to give them definition.  Looking at this on here, it does not really show the colours to their best.  It shows better if you click on it and look at the magnified image.

I enjoyed doing all of them and there is still the third one from Josie's class to be finished, but I am still thinking about the colours for that one.

If you have been finishing off some of your UFOs, why not share them on Facebook or on your blog.


Friday 12 July 2019

Friday is for finishing off

I am taking a different path today with my finishing off.  I would love to ask everyone to finish being unpleasant and hurtful.  "The Water Babies" by Charles Kingsley has two very important characters in it.  They are two ladies by the names of Mrs Be-Done-By-As-You-Did and Mrs Do-As-You-Would-Be-Done-By (try typing that lot fast).

I would show you a picture of my treasured copy of this book but I might fall foul of copyright law, so, instead, I will show you a picture that I did very recently.


To give credit where it is due, this piece came about after doing the Encaustic Make and Take with Mike and Shona Bossom at the recent Clarity Open Days in Ditton.  They inspired me to get my kit out and play with it at home.  Watching them on Hochanda taught me even more, especially the show where Mike Bossom and Barbara Gray swapped their skills.  I learned how to use stamping together with hot coloured wax. I know it is not brilliant but I enjoyed playing with the equipment and learning more from that play.

To me, crafting is a way to relax and escape from problems in life, and I don't think I am alone in that.  I need to escape from sad and bitter people who think they can get their own way by shouting and bullying others.  They need to think about Mrs Be-Done-By-As-You-Did, which is probably another name for Karma.  If you constantly dish out physical and verbal bullying, at some stage it will come back to bite you.  It will, also, only serve to make you even more sad, bitter and unpleasant. No-one wants to be with someone like that.

The other lady, on the contrary, Mrs Do-As-You-Would-Be-Done-By, is a much happier person, the kind of person you enjoy being with, and her Karma brings a much better life.  If you want people to treat you kindly and help you out, then you need to treat others with kindness and respect.  If you want respect, then you have to treat others with respect.

Back to the crafting world, the same applies.  There is an unpleasant minority that is so sick that they spend all their time trying to bully others and damage other people's reputations.  I try to keep out of the angry rows that come from this.  However, when a good friend or family member is being treated so unfairly, then I will step in and say my piece.

Let's all take a deep breath, then exhale hard to get rid of bad feelings and childish behaviour.  Spend your time doing nice things for others instead of trying to make them do things for you.

P.S. How could I have forgotten to give credit for the stamp on my picture?  Of course, it is one of the lovely Clarity stamps.  

Thursday 4 July 2019

Thursday - Tips and Techniques - PTCs

First of all, what are PTCs, I hear some of you say.  Originally, there were ATCs - Artist Trading Cards.  They were used a bit like business cards for artists and crafters, tiny pieces of art to be given as a sample of your talent.  These days, they are usually used as swaps, generally on a theme.  Then, Artist Trading Coins, round pieces of art, came into the picture.  The only real absolute rule is the size of these pieces.  The cards must not be bigger than 2.5 inches x 3.5 inches (64mmx89m), while the coins must not exceed 2.5 inches.  The main reason for this is to ensure they will fit into the plastic wallets designed to display them.


PTCs, both cards and coins, have to stay within that size.  This is a PTC (Parchment Trading Card) that I put together for a recent crop.  Despite the apparent intricacy of the design,  the whole thing is still only 2.5 inches x 3.5 inches.  So it fits properly into the wallets.

To make sure you get the right sizes, this is how I work.
1.  Cut your final backing card to the correct size out of white card and put the ATC backstamp on it (Clarity ATC Stamp).

2. Cut your parchment to the same size before starting your work.  You will almost certainly have some kind of a border to be cut, which will reduce the size of the parchment slightly.

3.  At some stage, either at the start or at the end of your work, you will also need a piece of backing paper or card to go between the white card and your parchment.  Ideally, that should be slightly smaller than the white card and slightly bigger than your finished piece of parchment.

By lining up all three in this way, you are showing off your work to its best.  Measure the backing card carefully and keep everything else within those limits.

Thursday 27 June 2019

Thursday -Tips and Techniques

I had so much fun yesterday.  My new extension lead arrived at lunchtime, so after putting my dinner in the oven, I draped the cable safely round the conservatory to put the socket on the right hand side of my desk.  That means I am not reaching across a hot iron.  This is a new craft for me, so it is all about learning and having fun.

I decided to really get brave yesterday (or stupid) and play with an A5 BLACK card.  Oh boy, that was a steep learning curve but so much fun.  I have already learned a very valuable lesson.  If it does not work out how I imagined, it does not matter one iota because I have had so much fun just playing.  It is not a waste of card.


This has not really photographed well but it is really moody and windswept.  It reminds me of the moors round Haworth (Bronte territory) on a stormy evening.  I think I will leave this as it is, certainly for now.  Having watched Barbara and Mike, I know I could change it totally if I wanted.

The second play piece is a remake of the one I didn't like from yesterday's blog.


To me, the proportion of sky and land really did not work.  So, I took the iron to it and then wiped the wax away with a tissue, before adding more restrained hills in the foreground.  Then, I still did not like the sky, so I swept more colour over it.  When I did it, I thought it was a stormy sky, but looking at it now, it looks like mountains rising up from the lake.


Now I have my kit set up on my desk in the conservatory, I get the feeling I will be doing a lot more playing, whenever I get a few minutes to spare.  I must remember to keep an eye out for intruders.  I had to evict a magpie from the doorstep, cheeky bird.  I think it was a youngster, but I don't particularly want his company.

Any of you who have the kit, don't let it moulder in the cupboard.  Get it out and just have fun.


Wednesday 26 June 2019

WOYWW 525 - a different desk.

With a number of things that have happened since the fantastic Anniversary Crop, I have been AWOL for a while and I apologise for not replying to those who commented last time.

Sadly, I had to take that final decision for Flash.  After that, I was down in Kent at the incredible Clarity Open Days.  Two days of watching and learning from incredibly talented crafters - Barbara Gray, Maria Moorhouse, Dee Paramour, Sam Crowe, Tina Cox, Linda Williams, Paul Church, Leonie Pujol, Lou Withers, Martine Smith, to name but a few.  

We also had the chance to do a Make and Take with Mike and Shona Bossum creating Encaustic art.  For those who have not come across this craft, it is the somewhat unpredictable art of painting pictures with a hot iron and melted wax.


I bought my starter kit a couple of years ago but never had the courage to get it out to play.  However, a brilliant lesson from Mike inspired me to get going and see what I could produce, as you can see from my conservatory desk.  These photos were taken on Tuesday afternoon after a fun time trying to remember what I had learned from a half hour lesson and watching on Hochanda.

My first attempt is due for another session with the iron today as I don't like it at all.  Much too dark with the colours becoming muddy.


The next two I will keep as I quite like them, although they are not perfect but I learned a lot from them.


I quite like the fence I managed to draw in on this one, and the folds of the hills.


This final one was intended as a seascape but changed a little as I played.


I feel sure I will be doing a lot more as I learn just what I can do with just a few blocks of coloured wax and a small iron.  It is a lot more fun than doing the household ironing.

I will let you go now on your way to visit the other desks on show at Julia's place, over at Stamping Ground.  Have a good day, everyone.

Thursday 20 June 2019

Thursday Tips and Techniques


Some of you know that I have been struggling with my snipping over the last few weeks.  Somehow my precious Ringlocks have been damaged.  Not a problem, I thought as I already had a new pair on standby.  

Oh boy, was I wrong?  Spectacularly wrong!

Three weeks later and I am still struggling to get used to them.  Struggling to the point that I have even tried today snipping with a very old pair of scissors that I dug out of the cupboard.  

Just because you have two pairs of apparently identical scissors, they will not behave quite the same.  Your new ones will almost certainly be stiffer until you have worked them in.  I took the advice of Jeannine from Clarity and sprayed the new ones with WD40 and then worked them well before cleaning off the excess.  

I also found that it helps to leave them at least overnight before using them in anger.  I have also prepped a page of perforations ready to snip out to make sure I can get it right.  Some are from the fine grid, which I prefer, and some from the bold grid, which I am not so keen on.

I started snipping picot about 15 years ago but really improved with the help of an experienced tutor more recently.  However, with the change of scissors, I really feel I have to go back to basics and do a lot of practice to get it right again.  It really is a case of lots of practice to succeed at any skill.

One of Leonie's phrases from her sticker collection seems apt.  Lots of people are scared to try the picot cutting.  Don't be.

IT'S OKAY TO BE SCARED, DO IT ANYWAY


Wednesday 19 June 2019

Wednesday - more photos

These are more general shots from the Clarity Open Days at Ditton.  Any of you who did not manage to get there this time, you missed a brilliant time.  I hope you manage to get there next time.  For £6 per day, you experience great tuition and help by the creme de la creme of great tuition and the chance to see just what your crafting goodies can produce.  You get fun and friendship from so many like-minded people.  Just look at the fun in these last photos.


Paul and Maria sharing the very last of Ruth's beautiful cakes.


Sam is still busy with her inking and stamping.


Some of Maria's watchers listening to Barbara doing the final raffle.  For those who were not there, part of your entry includes a raffle ticket which functions all day, when Barbara does a draw every hour on the hour.  The prizes are all very generous.


No idea what the joke was but it was obviously good.  Either that or hysteria after two full on days had set in.


Maria behind her little tree.


And finally ....... the lovely Linda Williams.  I did not manage to get to watch her this time.  I also missed Lou Withers and Martine Smith, and I failed to get any photos of Barbara.

Thank you all at Clarity for all the work you put in to make this such a great event for all of us.

Tuesday 18 June 2019

Tuesday is tidy up day

Here are the second batch of photos from the Clarity Open Days.  I do seem to have taken a lot of Sam Crowe, a lot of them from my position at the corner of Tina Fox's table.


What that lady can do with a gel plate!  Wow!  She started off with just two at a time, the big one and one of the Petites, lots of inks, mainly the mini Archivals, and also the Viva Decor paints, the ones that 

TaDa!


Boom!!!


From Sam, I edged my seat closer to the corner to chat with Tina, and learn how she does her beautiful parchment embroidery and beading.


Tina's work is so beautiful and distinctive.  I love watching her adding colour, and embellishments in her own way, but making sure the rest of us can follow and try it out for ourselves.

Here is just a bit of her work and that of the design team.


See the rows of beautiful haematite beads, adding more bling to this one.


I believe that this sample was created by Glynis Whitehead.  There are no holes on the plates for the flowers, but Glynis has adapted the design to add beads for the centres.


Karen Wheatland, Lynne Bishop and Rosalind McClellan listening and watching intently to Tina.


Not sure what Lynne was explaining so intently here.

Right, that's your lot for today.  More will follow tomorrow.  I want time today to play with some of my new goodies before I forget how to use them.  I am looking forward to seeing lots of your pictures of your experiments after watching the experts.  Have fun and have a great day.  Damp outside so perfect for crafting instead.